At Home In The Woods

   / At Home In The Woods #962  
For clay, a tine fork like you use to dig potatoes works well. You pierce the clay with the tines, and then lever it out with the handle. A narrow trenching shovel will also cut through the clay if you sharpen the edge and keep it sharp. A regular shovel has too much resistance in clay.

If it is a drain problem, I'd fix it right. Once you have your grass established, you won't want to tear it all out again to fix it. You could dig the whole area out with the BH and front loader or get a bobcat in there. Yes, it's a pain. Sorry that you've had this issue.
 
   / At Home In The Woods
  • Thread Starter
#963  
Today the new framing crew started. They fixed the height and width of the garage doors. The previous CM had made the garage door openings 7 ft high even though the house plans said 8 ft high. The new crew had to build a temporary support wall before tearing out the garage door openings because the wall that contains the garage doors is a load bearing wall. You can see the temporary support wall behind the LVL in the picture.

attachment.php


I really like the new framer. Tonight I talked with him about how to fix some of the issues. He seems very easy to deal with. We worked out some solutions together. He observed that our exterior doors were framed 3/4 inches too short and is raising the headers above the doors. We did not know know there was a problem before the framer brought it to our attention. He found that issue and is fixing it and isn't charging extra for it. Keep in mind that he must have gone around measuring things to make sure they fit the house plans.

Very happy.

Obed
 

Attachments

  • IMG_3519.JPG
    IMG_3519.JPG
    132.8 KB · Views: 1,286
Last edited:
   / At Home In The Woods #964  
Hi Obed,

Once again I have been paying sporadic attention to your project as I am concentrating on finishing my own addition and separate barn and apartment building.
I'm sorry to see you've had more than your fair share of headaches with the fired CM. Good you kicked him now when you can still get to fix things fairly easily.

Here is what has worked for me to stop the flow of shoddy overpriced material.
I put the name of those I want to have access to my lumberyard's charge account on the store's approved chargers and they buy items or order stuff over the phone to be delivered to my site. I get 10% off the regular price and my GC charges me 10% on materials, so it is a wash. But I have control of what gets returned and many many times things are ordered to be delivered by crane/boom truck which makes location of delivery go the way we want it to. Also it saves time not having 'my crew' having to unload and move stuff all over the place.
I go to HD on occasion for things like lighting fixtures, etc.
Sometimes I take my GC, or I should say I go with my GC and we pickup stuff in his larger than my truck; like mold proof sheetrock, for way less per sheet than I can buy it from my lumberyard.

I would encourage you to completely excavate out to the footing of the retaining wall and install drain tile, (with a sock over it to reduce the possibility of silt/ dirt, etc. clogging the holes), instead of just digging 1/2 way. Here is why. If you go halfway and it does not work you will have to go the rest of the way to fix it. If you fix it now while the ground is relatively 'soft' from having been recently back filled it will be easier than later when it has turned to stone. And if the wall kicks then you are.... well you get the drift.
And for point of information the guy who did the concrete should have done the drains around the entire house and retaining wall. That type of work is the excavator's job to complete unless some special arrangements were made?
Maybe you could get him to bring a piece of equipment to dig it for you since he had the concrete pour job? Its a thought.
I agree with Eddie and others who say get the tractor in the right position, even if you have to level off and then reset your house wall's adjacent grade- (if you are going to do it yourself). You don't want to add injury to insult by digging it at the precarious angle you're at now.
Good luck- I'd seriously consider what might be saved by having the foundation wall guy come do the work. He ought to give you a big break on doing it too since it should have been done in the first place when things were open and accessible. At least consider pricing it out with him or someone else if you prefer. That way you can decide what if anything you are saving by doing it yourself. Some jobs are just not worth the aggravation to do when someone else can do it fast and you can move on to more important items.
 
   / At Home In The Woods #965  
Looking at your tractor diggin on the slope, you are indeed a little brave. However, I am surprised you didnt use your bucket as an achnor. Curling the bucket all the way forward and back and then drive it down will cause the bucket to dig in giving you tuggin power.
 
   / At Home In The Woods #966  
Please stay off that grade with your machine.
 
   / At Home In The Woods #967  
My wife and I live in a camper. We have lived in a camper for most of the past 12 years. We would like to live in a house. I will share in this thread our quest to live in a house like normal people.

Obed

Somebody told me one time when I was looking to buy a home. Owning your own home is The American Scheme. Now why would they say something like that? :confused: Thanks for posting! KK
 
   / At Home In The Woods #968  
I really like the new framer. Tonight I talked with him about how to fix some of the issues. He seems very easy to deal with. We worked out some solutions together. He observed that our exterior doors were framed 3/4 inches too short and is raising the headers above the doors. We did not know know there was a problem before the framer brought it to our attention. He found that issue and is fixing it and isn't charging extra for it. Keep in mind that he must have gone around measuring things to make sure they fit the house plans.

Very happy.

Obed

What is the current height of the door headers?
 
   / At Home In The Woods
  • Thread Starter
#969  
Today is the second day the new framing crew has been on the job. They worked Monday then went to finish another job and were back today (Thursday).
attachment.php

Yes those are shingles! The back side of the house still has felt. Sheathing on half the garage roof and on the portion of the roof that joins the garage to the house has been removed in order to redo the rafters so that the upstairs will accommodate the floor plan.
attachment.php

This picture shows the overhead garage door openings that had to be redone in order to match the house plans. The door openings are now 8' 1 1/2" tall to fit 8' high doors. One door opening is 10' 3" wide to fit a 10' wide door. The other opening is 9' 3" wide to fit a 9' wide door.

Tomorrow morning will we meet with the truss guy to try to come up with a plan to fix the trusses that are in the wrong place and interfering with the fireplaces and chimney.

We are also meeting with the electric company in the morning to discuss where to put the cut-off panel that will be near the transformer. We will be installing a 400 A panel outside beside the transformer so that we can so that we can cut off all power to the house. That way I will be able to do work in the 2 electric panels inside the house without having to call the power company. I intend to dig a trench between the outside cut-off panel and the house in preparation for running two 200A lines to the house.
 

Attachments

  • IMG_3528.JPG
    IMG_3528.JPG
    166.6 KB · Views: 1,080
  • IMG_3525.JPG
    IMG_3525.JPG
    99.2 KB · Views: 1,071
   / At Home In The Woods
  • Thread Starter
#970  
attachment.php


The framing and sheathing for the roof got finished today. Felt is covering the roof except for the eyebrows. Some more shingles got installed today. The roofers had to quit because they ran out of Ice & Water shield. My wife went to Home Depot this evening to get another roll (Home Depot brand) so the roofers can continue their work tomorrow.

attachment.php

Today I started digging the trench for the electric line between the pedestal cut-off/transformer and the house.

attachment.php

Painted a line then started digging beside the line.

attachment.php

You can see the temp elec. pole and transformer in the background. We will install a pedestal a few feet behind where the temp pole is. The pedestal will hold the power meter and a panel with two 200A breakers. Each 200A line will each run from the pedestal to its own 200A panel in the basement. One panel will feed the basement; the other will feed the rest of the house.

attachment.php

I dug the initial part of the trench so it will be 4 feet deep below the final grade. We need a 2 ft separation between the electric line and anything that crosses it. Unfortunately, the water line from the well and the gas line will both have to cross the electric line in order to attach to the house at their designated spots. So in order to run the water line 2 ft deep for freeze protection, I had to make the electric line 4 ft deep where the two cross near the house. I'll dig the electric line 2 feet deep the rest of the way.

attachment.php

As you've heard me say before, digging here is tough. I hit this rock during the 1st 5 minutes of digging. If you look closely, you can see a glove on the rock for perspective. It took quite a while to get this rock out of the ground.

attachment.php

Here's how far I got on the trench today. It took me about 3 hours to dig this much. I hope I make faster progress tomorrow.

I then spent 90 minutes scraping gravel off the area where I will be digging tomorrow weather permitting. This will be the front yard so I don't want gravel there anyway.
 

Attachments

  • IMG_3537.JPG
    IMG_3537.JPG
    121.9 KB · Views: 988
  • IMG_3535.JPG
    IMG_3535.JPG
    194.4 KB · Views: 986
  • IMG_3534.JPG
    IMG_3534.JPG
    196.9 KB · Views: 991
  • IMG_3533.JPG
    IMG_3533.JPG
    180.2 KB · Views: 1,006
  • IMG_3538.JPG
    IMG_3538.JPG
    156.6 KB · Views: 983
  • IMG_3539.JPG
    IMG_3539.JPG
    202.6 KB · Views: 978
  • IMG_3540.JPG
    IMG_3540.JPG
    192.7 KB · Views: 1,067
Last edited:
   / At Home In The Woods #972  
As you've heard me say before, digging here is tough. I hit this rock during the 1st 5 minutes of digging. If you look closely, you can see a glove on the rock for perspective. It took quite a while to get this rock out of the ground.

Obed, two thoughts here. Since digging is so hard why not rent a large tractor loader backhoe to dig the trench and also use it to dig out the area next to the retaining wall. You would be able to position the tractor parallel to the retaining wall and extend the hoe out far enough to dig to the bottom and end of the retaining wall. And it would be a lot safer than the way you have your deere perched on that slope. Also with the larger tractor you could use it for other small projects at the house.
 
   / At Home In The Woods #973  
Any auto parts store should have a tool to open up grease fittings. It's a small unit that fits over the fitting and when hit with a hammer it drives the spring loaded ball in the fitting down in turn opening the fitting to accept grease.
 
   / At Home In The Woods #974  
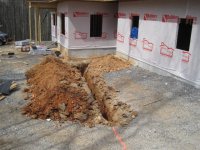
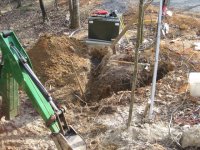
No, No, No! Put the the water down at 4' and run the electric at 2 feet. I know you're in Tennessee, but if the frost ever goes below 2' and you have a water leak then you'll be kicking yourself. And fixing a water leak in a trench that shares electric and gas lines in winter- you DO NOT want to go there.
My master electrician stood here and told me to tell you that as we looked at your pics.
He also said: ask him why he needs 200 amps for just the basement? What are you going to be running that you'd even need 400amps to a residence?! Are you going to be launching space shuttles from your basement?!:laughing:
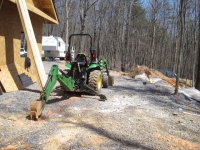
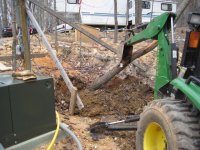
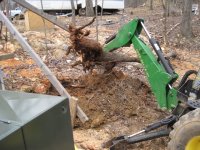
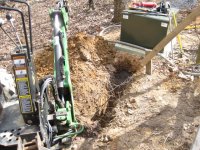
Here's what I'd do in your situation. Complete the 2' deep section from your poles or pad location where your electric will be feeding to the house. Then dig your 4 foot deep section for the water run. Lay in and pressure test the water run for possible leaks with compressed air. Once you know it does not have any leaks you can cross it with your electric line at 2' deep. Where your gas line crosses your water line set it in at 2', (or deeper, if required). Have your gas supplier do the testing so if there are any problems they are discovered BEFORE you bury the pipe. It needs to be sized properly to your appliances and intended usage. You may be required to use sand for the gas line trench as fill around and over the pipe- talk to your gas company first!
You must flag your gas line with special gas warning tape in the trench.
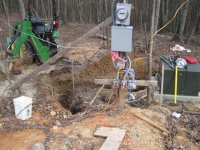
Take measurements off non-movable objects, like the corner of the house, to record exactly where everything crosses and runs for future reference. Hopefully, when everything is tested for leaks and hooked up you will never have to dig any of it up to correct or modify anything.
I was not so lucky. We had the gas company and the excavator and electrician do everything underground and after several weeks we started to smell gas. It turned out the fitting on top of the 1000 gallon BURIED propane tank was leaking!:mad: The gas company had to come drain the tank completely and then BURN off the excess gas they could not remove from the underground tank. Fortunately I was in Maine skiing with my son and a friend of his- but I was keeping an eye out for any sudden fireballs in the sky!
The crew here said it was quite the site to roast pigs at if you could crane them into the sky to catch the flame!:confused2:
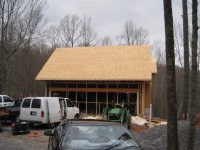
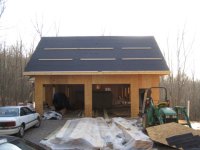
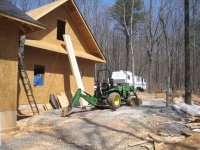
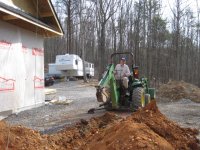
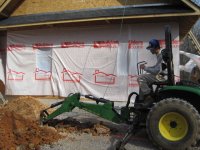
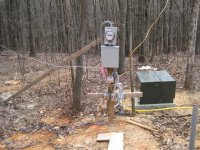
Post back with any questions. I've done all the trenching you could ever hope to see over the last 5 years or so. I had a pole with transformer above my pond, and from there my service is owned by the electric co. to my house where there is one 200amp service entry which connects to a 200 amp transfer switch that is controlled by a separate load control center that reads the status of electric supply, gas powered 20KW gas generator or utility power, and switches between whichever is active, while dropping high amp loads like hot tub, double oven and 2 other circuits, as needed and then latches them back on as power use permits. These controls feed 2, 30 breaker panels in the basement and one 20 amp panel in the addition. The 200amp supply then feeds 100 amps underground in two different directions; each of which is then connected to a 30 breaker panel. One is in the shed. The other is at the barn's mechanical/electrical room. From the barn's panel 50-70 amps is sent to the second floor to a 20 breaker panel.
It all works off one 200 amp service from the utility. I have water, gas, solar and electric in the various trenches, though not all have each item in each trench. Its like a small city! And it seems like it cost what it would to build one too!:(
But when the power goes out and its wicked cold out and the wind is blowing a 50mph or more I'm inside doing whatever I can do, with power on and gas for heat and cooking- so its GREAT! and worth the effort to get it done right the first time.
 
   / At Home In The Woods
  • Thread Starter
#975  
Any auto parts store should have a tool to open up grease fittings. It's a small unit that fits over the fitting and when hit with a hammer it drives the spring loaded ball in the fitting down in turn opening the fitting to accept grease.
I'll have to check into one of these. This morning I removed some clogged grease fittings and cleaned them out which seemed to work. However, there was one spot that I couldn't grease even with a working fitting. Sounds like a good rainy day job.
Hey, it just occurred to me that I have a garage now with shingles. I've never owned a garage where I could do rainy day tasks. Wow!
 
   / At Home In The Woods
  • Thread Starter
#976  
No, No, No!
Coyote, great suggestions. Sounds like you've got quite an intricate electical setup at your place.

We plan on running gas, water, and electric all in their own trenches although they will need to cross. The wife is going to get some estimates on getting someone to dig the trenches for us. I just don't have enough time to dig them all. Each trench is about 80' to 100' with a bunch of rocks. I got about 1/3 of the electrical trench dug this weekend myself.

attachment.php

Here's how far I got. I'm sure that others could dig faster than I can, especially with a bigger machine.
 

Attachments

  • IMG_3544.JPG
    IMG_3544.JPG
    160.1 KB · Views: 1,524
  • IMG_3543.JPG
    IMG_3543.JPG
    178.8 KB · Views: 229
  • IMG_3542.JPG
    IMG_3542.JPG
    164.6 KB · Views: 226
  • IMG_3541.JPG
    IMG_3541.JPG
    136.1 KB · Views: 220
   / At Home In The Woods
  • Thread Starter
#977  
Today, after digging some of the electrical trench at the house, the wife suggested that we get some estimates for someone else to dig the trenches (electrical, gas, water). So I then focused on prepping the area where the electrical pedestal (holds meter and two 200A disconnects) will go.

attachment.php

The pedestal will go just to the left of the temp pole and a few feet behind it.

attachment.php

I needed to get rid of the broken off tree.

attachment.php

The backhoe comes in really handy for removing trees.

attachment.php
 

Attachments

  • IMG_3548.JPG
    IMG_3548.JPG
    187.9 KB · Views: 4,270
  • IMG_3549.JPG
    IMG_3549.JPG
    140.3 KB · Views: 1,300
  • IMG_3550.JPG
    IMG_3550.JPG
    167.6 KB · Views: 1,340
  • IMG_3551.JPG
    IMG_3551.JPG
    180.1 KB · Views: 1,333
   / At Home In The Woods
  • Thread Starter
#978  
As part of prepping the area for the pedestal, I shortened the braces for the temporary electrical pole to make way for the trenches and conduit.

attachment.php

I dug a trench between the transformer and where the electrical pedestal will go in preparation for the electrician's conduit.

attachment.php

I then started the trench that runs from the pedestal to the house. I dug the trench to the temp pole brace. The excavator should be able to dig from the other side of the brace and finish the trench to the house. Where the two trenches meet is where the pedestal will be located.

attachment.php
 

Attachments

  • IMG_3555.JPG
    IMG_3555.JPG
    212.1 KB · Views: 1,878
  • IMG_3557.JPG
    IMG_3557.JPG
    207.4 KB · Views: 2,028
  • IMG_3558.JPG
    IMG_3558.JPG
    181.6 KB · Views: 1,369
   / At Home In The Woods #979  
I'll have to check into one of these. This morning I removed some clogged grease fittings and cleaned them out which seemed to work. However, there was one spot that I couldn't grease even with a working fitting. Sounds like a good rainy day job.
Hey, it just occurred to me that I have a garage now with shingles. I've never owned a garage where I could do rainy day tasks. Wow!

Just remember which garage is going to be yours and which will be the wifes. You don't want to get grease and mud on her garage floor. :laughing:

Also, remember to check the height of your ROPS and backhoe before driving into the garage.
 
   / At Home In The Woods #980  
Just remember which garage is going to be yours and which will be the wifes. You don't want to get grease and mud on her garage floor. :laughing:

I resolved that issue by building a "man garage" and a "woman garage". Cars are not parked in the man garage.
 

Tractor & Equipment Auctions

30 INCH TOOTHLESS BUCKET FOR MINI EXCAVATOR (A58214)
30 INCH TOOTHLESS...
2014 Ford Fusion Passenger Car, 2.5L Engine - Only 90,875 Miles (A56438)
2014 Ford Fusion...
23105 (A56859)
23105 (A56859)
2022 NEW HOLLAND 266BMM 66-INCH BELLY MOUNT FINISHING MOWER WITH SIDE DISCHARGE (A57024)
2022 NEW HOLLAND...
12 X 20 CAR PORT (A58214)
12 X 20 CAR PORT...
Margaritaville Miniature Decorative Truck (A59231)
Margaritaville...
 
Top