At Home In The Woods

/ At Home In The Woods #1,261  
Obed - You may want to think twice about that when living so close to the woods. Critter like skunks and raccoons have been known to use them looking for food. Big enough and small skinny burglars can squeeze thru them and gain entry to your house.

Owning pets is a commitment that requires making sure you care for their personal needs no matter what time of day it is.

My neighbor installed one in his basement door and so far has been visited with a skunk and other neighbors cats helping themselves to his cat's food.


They do make some fancy dancy ones that the pet has a keycollar to unlock the pet door to keep the riffraff out, I'm sure they are cheep!!

tom
 
/ At Home In The Woods #1,262  
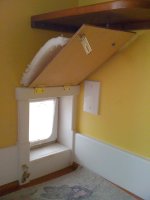
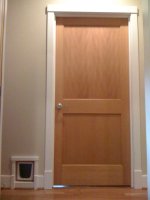
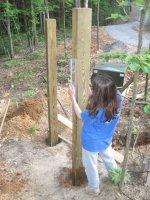
We have built-in cat doors in our house. We have two decks, a screened in deck and a open deck. Neither has steps going down to ground level. The screened in deck cat door is available all the time. The one to the open deck has a little swing door I made that can be locked. It is closed at night. You can see the little padlock for it in the picture, those cats are crafty (but we can leave the key in the lock :laughing:). The white foam is for insulation and to keep the wind and rain from blowing the door in (and getting things wet) when the door is locked.

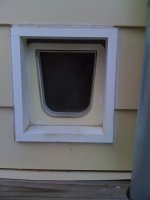
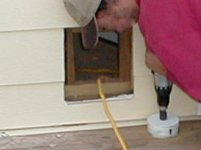
There is also a pictures of that door from the outside, and a bad close up of how it is framed. Basically, we framed with 2x4's. We bought two brands of doors and make the size such that the door can be changed out without having to re-do the trim for the door. Caulk fills in the little gaps. So the door can be replaced without ripping up any trim.

The covered box by the cat door has a cat-5 that will someday go to electronics I'll be making. I'll design a 130 KHz loop antenae that is in the trim around the door, and run an RF ID so we know which cat is using the door. (quick home automation digression)

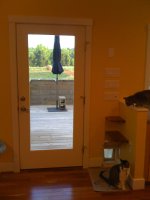
The bigger view of the door (the one that include cats that were curious as to what I was doing) shows why we did the doors separate. We wanted the full view window doors (Full Light Door). The cats like them too- they can sit and watch the outdoors. The "shelves" are cat steps. If we put a block at the bottom, when they get old they can still climb up to that one counter.

There is also a shot to the screened in deck door (you can tell the deck is covered and see the cross pieces for the screening). Again, the build in door make the people door very nice. Another box for RF ID. This approach is spousal approved and the big door - little door gets a very high "cute" rating from the same judge.

Finally, there is a shot of the people and cat door into the snoratorium. There is a similar set into the master bedroom. This lets the cats rome around at night while maintaining the sound isolation of the snoratorium (used in the unluckily event of snoring). Again, the big and little doors rate very high on the spousal approval scale (as does the snoratorium). The cost of triming the cat door is _more_ than the people door :confused2:. Exact same cuts, but the smaller pieces make it difficult and there has to be some trim wood put in (whereas the people door the trim is part of the door). The 2x4's are thinner than the wall, so the box has to framed out. Can't find a picture of a door before framing, I'll keep looking.

I would imagine that the same process could be used for a dog door. It is a big win to have the cats able to outside on their own. They are protected from the world since they can't get to the ground. The door we lock each night to the open deck keeps any deck climbing critters out. The door to the screened in porch is also a bit win since when it's 3:00 AM and the cats want out they can go listen to the frogs on the pond from that porch. Finally, the look of it all is very nice and unique compared to the critter door _in_ the half light people door.

Hope these pictures help you make a decision. I like this style better than the half light door with user added pet door. The pets can see out. Since you are in the fog of construction with a billion things to do, maybee you figure out how to do one like this. We have other cat features in the house, but I'll skip those so as to keep on todays topic.

Pete
 

Attachments

  • cd1.jpg
    cd1.jpg
    281.5 KB · Views: 289
  • catdoor2.jpg
    catdoor2.jpg
    159.9 KB · Views: 249
  • catdoor5.jpg
    catdoor5.jpg
    155.9 KB · Views: 227
  • cd_frame.jpg
    cd_frame.jpg
    200.6 KB · Views: 240
  • catdoor4.jpg
    catdoor4.jpg
    188.9 KB · Views: 224
  • cd3.jpg
    cd3.jpg
    282.5 KB · Views: 226
/ At Home In The Woods
  • Thread Starter
#1,263  
We have built-in cat doors in our house...Pete
Pete,
The pictures are a tremendous help. We've been trying to figure out how to prepare the house for installing them. Thanks!

Obed
 
/ At Home In The Woods
  • Thread Starter
#1,264  
Mud Mud Mud!
Last week I finished cleaning the footers in preparation for the brick installation. Then we got an incredibly heavy rain on Monday.

attachment.php

Our footers got covered with mud again. When it happened the first time after the rains that flooded Nashville, I figured that was an anomoly. But less than 2 weeks later, we got another unbelievable downpour. Now I'm back to the drawing board.

I'm in this circular loop. It's like a bad movie. The footers are lower than the surrounding dirt. I can't backfill the footers to make water run away from the house until the brick is laid. We won't get the rain gutters installed until after the brick is 1st installed, and after the soffits are installed. But everytime I clean the mud off the footers, it rains and covers them with mud again.
 

Attachments

  • IMG_3971.JPG
    IMG_3971.JPG
    111.9 KB · Views: 1,109
  • IMG_3970.JPG
    IMG_3970.JPG
    120.1 KB · Views: 180
  • IMG_3972.JPG
    IMG_3972.JPG
    149 KB · Views: 192
Last edited:
/ At Home In The Woods
  • Thread Starter
#1,265  
It became obvious that I need to give the water a path to drain away from the footers.

attachment.php

So this evening after work I dug a trench. After the brick is laid, I will put a drain tile beside the retaining wall and will put a drain pipe in the trench to drain the water that gets into the drain tile. I put a level on a board to measure the slope to make sure I get at least a 1/4" per foot drop. My level has a mark etched into the glass that shows the 1/4" per foot drop.

attachment.php
 

Attachments

  • IMG_3978.JPG
    IMG_3978.JPG
    203.1 KB · Views: 297
  • IMG_3977.JPG
    IMG_3977.JPG
    173.2 KB · Views: 169
  • IMG_3976.JPG
    IMG_3976.JPG
    180.4 KB · Views: 1,285
  • IMG_3979.JPG
    IMG_3979.JPG
    171.9 KB · Views: 209
  • IMG_3985.JPG
    IMG_3985.JPG
    160.3 KB · Views: 173
  • IMG_3981.JPG
    IMG_3981.JPG
    159 KB · Views: 189
  • IMG_3988.JPG
    IMG_3988.JPG
    161.2 KB · Views: 190
  • IMG_3989.JPG
    IMG_3989.JPG
    144.8 KB · Views: 1,049
/ At Home In The Woods #1,266  
Glad the pix helped, sounds like there was spousal approval too.

I had to dig and clean off the footers for our garage 4 times during construction before the block was placed there. Ditch looks good, I think you've got control of this drainage problem even if no one can control the weather.

I've got a project I started in October that has been waiting for good weather to finish. I've had a few interruptions that didn't help.

The day you can declare that the project is indeed out of the mud is a great milestone in your home's construction. It's astounding how much infrastructure is buried in and around a properly constructed modern house! Thanks for keeping everyone posted, and you'll really be glad you have all these pictures of this big event in your life.

Pete
 
/ At Home In The Woods #1,267  
My neighbor installed one in his basement door and so far has been visited with a skunk and other neighbors cats helping themselves to his cat's food.

I remember well the night I came back to the house in CA after being in OR for a week.

The dogs went crazy after entering the house and I soon discovered that a raccoon was in the house after entering through the dog/cat door. Knowing that even a medium raccoon can maul a large dog pretty thoroughly I put the dogs back in the car and contemplated how to dispatch the raccoon.

First discovery was that even though the .22 target pistol was in the house, all of the .22 ammo was in Oregon. After thinking and searching the available tools boiled down to a .45 or a WWII bayonet --about 18" long and sharp enough, but seemingly a bit short.

Finally settled on the bayonet as less likely to put holes in the walls and spatters of blood all over.

It took 20 minutes of crawling on the floor and threatening with the bayonet, while the raccoon threatened right back, to get it to go back out the dog door.

A. You want one that only your pets can activate.

B. The pet door should not be from the house into the garage, as much as the garage would form a convenient antechamber for the pets. The door will compromise the fire barrier required between the house and the garage.

C. For general, around the house wildlife repellent, a squirt bottle full of ammonia is hard to beat -- almost nothing smaller than a bear will attack if you are spraying it with ammonia and there are no blood stains to clean up afterward.
 
/ At Home In The Woods #1,268  
I had dirt cave in before I got my footer drain installed, so I had to dig it all out by hand. Fortunately not twice. hope you beat the next rain.
 
/ At Home In The Woods
  • Thread Starter
#1,269  
... and I soon discovered that a raccoon was in the house ...
CurlyDave, That's an interesting story.

When we lived in Charleston, SC, the bottom floor of our tri-level house got flooded by Hurricane Hugo. We tore all the sheetrock and carpet out of the downstairs to let things dry out. There was a gap in the wall where the HVAC ductwork came into the house from the crawl space. One evening we found an opossum in our kitchen eating cat food out of the cat's bowl. We actually were amused. When the opossum saw us, it waddled off and exited through the gap in the downstairs wall. Opossums are very slow moving creatures.

On another night, the wife saw the opposum sneak through a bedroom door upstairs. She searched the room but couldn't find the opossum. After she got me involved, I found it hiding behind and under a desk. Armed with a broom, I chased the oposum downstairs and out the front door.

Later, one night while in bed, my wife rolled over to find herself face to face with the opossum. The opossum was snooping through the waste basket beside the bed. While I slept, my wife chased the opossum downstairs and cornered it. By now the wife was fed up so she started beating the poor opossum with the bristle end of the broom. The opossum stayed in the corner and hissed at her while she accosted it. She then started feeling sorry for beating the opossum. So she subsequently trapped it inside a cardboard box. The opossum hissed at her but did not put up a struggle as she boxed it up. She put the box and opossum into the car and took the opossum down the road a couple miles and let it go. That was the last we saw of the opossum.

We discovered that the opossum had been sleeping in our master bedroom closet in a box that contained our winter sweaters. The box was covered with opossum hair. The opossum had made itself a nice cozy bed. We aren't quite sure how long the opossum had been living in our bedroom with us; it was at least a few days. The opossum seems to have been house broken because we did not find any opossum excrement in the house.

Obed
 
/ At Home In The Woods #1,270  
With all the talk of cleaning the footers I happen to notice that my neighbors house which is brick the footer is above ground all around his house with the lowest (to ground level) being about a foot. It is painted cement. That makes sense to me rather than burying brick below ground level. Common sense tells me that brick and mortar are porous and if water can get behind the brick it could lead to mold or maybe damp area which would attract termites. Just my 2「.

Guy
 
/ At Home In The Woods #1,271  
When I read govt reports on homes that are foreclosed, there is a statement concerning the distance above ground to the masonry or siding.
 
/ At Home In The Woods
  • Thread Starter
#1,273  
/ At Home In The Woods
  • Thread Starter
#1,274  
Eyebrows got installed on the front porch today.

attachment.php

The workers originally pulled out new 2x6 boards to cut for the eyebrows. We showed them some scrap wood and asked them to use the scraps for the short boards at the bottom of the eyebrows.

We had the framer tilt the supports under the porch outward so that block and brick can be laid for the porch.
 

Attachments

  • IMG_4078.JPG
    IMG_4078.JPG
    158.7 KB · Views: 312
  • IMG_4077.JPG
    IMG_4077.JPG
    124.5 KB · Views: 1,149
/ At Home In The Woods
  • Thread Starter
#1,275  
Here's a picture that shows what I was trying to describe here.

166280d1274586790-home-woods-img_3975.jpg

You can see the gap left for the brick to go between the porch roof and the house sheathing.

The top of the porch also was just a couple of inches below the living room windows above it befor the porch roof got rebuilt. When looking out the living room windows, the first thing you would see would have been the porch roof. That would have been very distracting. Also, I didn't want rain water splashing from the porch roof onto the windows. So the porch roof got lowered by a foot.
 

Attachments

  • IMG_3975.JPG
    IMG_3975.JPG
    134.9 KB · Views: 836
/ At Home In The Woods
  • Thread Starter
#1,276  
The drain tile that I installed to go under the spot where the electrical lines will enter the basement wall got messed up by the deluge of rain we got about 3 weeks ago.

attachment.php


The gravel and drain tile got filled with red clay silt. I couldn't access this spot with the backhoe so I had to remove all the gravel by hand. I shoveled the silt filled gravel into the FEL bucket and put it on the driveway.

This area is once again prepped for re-installing the drain tile. I'm waiting until just before the electrical conduit is laid to re-install the drain tile in this spot. It only takes one hard rain and I'll have to do this all over again.
 

Attachments

  • IMG_4070.JPG
    IMG_4070.JPG
    160.9 KB · Views: 1,027
  • IMG_4071.JPG
    IMG_4071.JPG
    191.4 KB · Views: 316
  • IMG_4074.JPG
    IMG_4074.JPG
    157.5 KB · Views: 306
  • IMG_4080.JPG
    IMG_4080.JPG
    147.1 KB · Views: 321
/ At Home In The Woods
  • Thread Starter
#1,277  
Unexpected Visitors
I finally got back to finishing the prep work for the electrical pedestal. A few weeks ago I dug the first post hole. I had put a board over the empty post hole to minimize rain water from entering the hole and keeping the bottom wet. When I moved the board, I found a toad and a lizard both trapped in the hole. The hole was about 3 feet deep, just a few inches too deep for me to reach in and grab the visitors with my hand. I was able to use a hoe to retrieve the toad. Getting the lizard out was a little more challenging as there was no way to get the lizard to climb onto the hoe. I was able to coax the lizard onto a stick and lift the stick with the lizard attached out of the hole.

attachment.php

I thought this lizard to be pretty cool looking. This variety of lizard is larger than the lizards I'm used to seeing in Tennessee. I have seen several lizards like this one on our property.
 

Attachments

  • IMG_4085.JPG
    IMG_4085.JPG
    175.9 KB · Views: 1,129
  • IMG_4084.JPG
    IMG_4084.JPG
    185 KB · Views: 347
  • IMG_4082.JPG
    IMG_4082.JPG
    162 KB · Views: 352
  • IMG_4081.JPG
    IMG_4081.JPG
    177.4 KB · Views: 322
/ At Home In The Woods
  • Thread Starter
#1,278  
Pedestal Posts
I dug the second post hole by hand about 3 ft deep and 12" in diameter. I had an audience while I dug. I put 6" gravel in the bottom of the hole, tamped in two eighty pound bags of QuickCrete in the hole and added some water periodically. I then filled the rest of the hole with dirt and tamped it in. The wife helped hold the posts level while I applied the QuickCrete and dirt.

attachment.php

The posts are 4 feet O.C., the size needed for the pedestal. You can see the"V" shaped trench. Conduit will run from the transformer to the pedestal, then from the pedestal to the house.
 

Attachments

  • IMG_4087.JPG
    IMG_4087.JPG
    207.6 KB · Views: 339
  • IMG_4089.JPG
    IMG_4089.JPG
    151.5 KB · Views: 454
  • IMG_4090.JPG
    IMG_4090.JPG
    147 KB · Views: 355
  • IMG_4092.JPG
    IMG_4092.JPG
    169.8 KB · Views: 495
  • IMG_4097.JPG
    IMG_4097.JPG
    196.6 KB · Views: 15,527
Last edited:
/ At Home In The Woods
  • Thread Starter
#1,279  
Kitchen Layout Problem

The framing crew framed the kitchen pantry and the wall for the bar between the kitchen and the eating area.

attachment.php


Here's a view from the living room.

When we saw how close the end of the bar would be to the pantry, it was obvious that the walkway between the two into the kitchen was way to small. We don't want a congestion point here as people try to enter the cooking area. This walkway is less than 3 feet wide. After much fretting, my wife redesigned the bar and associated cabinetry in a way that would provide a 4 foot wide opening into the kitchen. Unfortunately, to do so, the wife had to kill the 45 degree bar top. I'm personally not exited by 45 degree walls but that was something the wife really loved. The bar will now have a 90 degree turn instead of two 45 degree turns.

The framer will have to come out and build the new bar wall. That should be the last of the interior framing work.
 

Attachments

  • IMG_4094.JPG
    IMG_4094.JPG
    118.5 KB · Views: 316
  • IMG_4095.JPG
    IMG_4095.JPG
    121.7 KB · Views: 1,128
/ At Home In The Woods #1,280  
We had a similar half wall in our kitchen. One thing we did was to take a few of the 2x4's that's part of the wall and take them through the subfloor to the trusses below. Had to use some 2x6 between 2 trusses to get it all to line up. The win here is that the wall is a lot more stable. If nothing else, I'd try to get the dead end of the wall since this is something that will get run into. That way, both ends of you're 90 degree mini wall are stout attachment points.

At a minimum think about bolting the wall to the sub floor in 2 or three spots instead of just nailing it. Put a 2x6 on the other side making a "subfloor sandwich" so it not relying solely on the strength of the aventech subfloor. If the wall will have an eat in area extending out from it, this is even more important. Without firm attachment, you are relying on your cabinets to hold the wall in place and keep it from flexing. This is yet another perfect homeowner job. The framer does what they do, you come in later and beef it up a bit.

Finally, if there is any way you can talk the framer into putting a blob of glue (like the Gorilla Glue ?) on the vertical 2x4's, between the glue and then you bolt through you'll be good to go. If you make sure the glues on site, should not be a big extra for the framer to do. Seems like extra charges _really_ get extra if it's something the tradesman does not normally do...

Pete
 

Marketplace Items

2017 GENIE GTH844 TELESCOPIC FORKLIFT (A60429)
2017 GENIE GTH844...
2023 CATERPILLAR 120 MOTORGRADER (A60429)
2023 CATERPILLAR...
MINI KID DIRT BIKE (A56859)
MINI KID DIRT BIKE...
2020 CATERPILLAR D6 LGP CRAWLER DOZER (A60429)
2020 CATERPILLAR...
2022 WACKER NEUSON EZ26 EXCAVATOR (A60429)
2022 WACKER NEUSON...
TANK MANIFOLD (A55745)
 
Top