Creating a Workshop & Home

/ Creating a Workshop & Home #161  
Eddie,
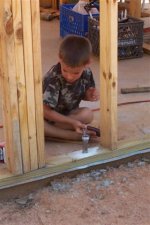
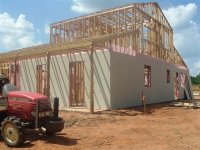
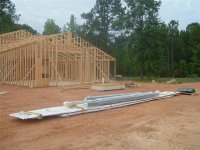
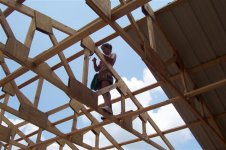
Strong Tie makes a metal bracing that will keep the building square.
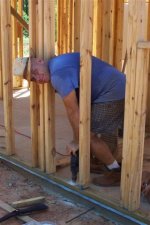
I notice that there are no fire breaks in the walls. They would also help a little on the squareness and well as prevent a fire chimney if one ever gets started in the walls.
I lived in earthquake country for around 40 years and since leaving, anything I build is still built with that in mind.
Another thing I have used is a hurricane brace on at least two of the corners. Two 1/2 inch plywood 4x8 sheets nailed into each of the corners, nailed into each stud at 2 inch intervals or closer. It is amazing the extra strength this gives a building.
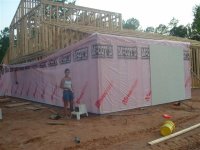
Your siding will more than likely do what you need but the extra labor and expense really won't be that much.
 
/ Creating a Workshop & Home #162  
</font><font color="blue" class="small">( These angle braces will hold it until my siding gets here. Lesson learned.
)</font>

When I built my home, I used braces like this, but they were laid across the wall and the studs marked. Then, using the circular saw, saw kerfs were made on both the top and bottom that were 1 1/2" deep. Then using a hammer, each piece was hit and broken out of the studs. A quick clean up with a chisel and then the bracing was nailed into the grooves that were made in the studs. This is called "let in bracing". It added great stability to the walls before sheathing and also I have had no plaster cracks from the walls moving in over 25 years. It doesn't take very long and it will keep the walls from racking in the future.
 
/ Creating a Workshop & Home #163  
<font color="blue"> When I built my home, I used braces like this, but they were laid across the wall and the studs marked. Then, using the circular saw, saw kerfs were made on both the top and bottom that were 1 1/2" deep. Then using a hammer, each piece was hit and broken out of the studs. A quick clean up with a chisel and then the bracing was nailed into the grooves that were made in the studs. This is called "let in bracing". </font>

Back in the days before plywood and OSB sheathing, this let-in bracing was a standard practice on new construction. It adds a little bit of extra time, but it might be worth it in Eddie's projects, since the siding is going right on top of the studs...

Image2424.gif
 
/ Creating a Workshop & Home
  • Thread Starter
#164  
Thanks guys. I'm aware of the technique, but decided not to use it as part of my experiment with the HardiPanals.

Two other methods that are used in California, where I'm from, are metal strips tied into the sill plate, and metal stips tied into the foundation.

In fact, one of the newer requirements in some earthquake areas of California require the metal straps to be tied into the rebar in the footings and continue to the rafters. I forget the spacing of this, but every four feet sounds about right.

Plus the sheathing must be used on "ALL" exterior walls. Not just the corners.

I've got clear skies for the next week, so I should be good until the panals get here on Tuesday.

Eddie

Andy, Thanks for the diagram, sure nice to see them!
 
/ Creating a Workshop & Home
  • Thread Starter
#165  
I needed to add a few more bolts to my sill plates and figured it would be easier before the siding went on.

Bosch hammer drill with 1/2 inch Bosch bit. This is a really nice bit!!
 

Attachments

  • 686575-Workshop 218 (Small).jpg
    686575-Workshop 218 (Small).jpg
    30.4 KB · Views: 553
/ Creating a Workshop & Home
  • Thread Starter
#166  
My assistant hammered in the bolts.
 

Attachments

  • 686580-Workshop 213 (Small).jpg
    686580-Workshop 213 (Small).jpg
    28.7 KB · Views: 534
/ Creating a Workshop & Home
  • Thread Starter
#167  
My other assistant put the washer and nut on.
 

Attachments

  • 686581-Workshop 211 (Small).jpg
    686581-Workshop 211 (Small).jpg
    32.2 KB · Views: 507
/ Creating a Workshop & Home
  • Thread Starter
#168  
And then my assistant tightens them down.

It's good to have helpers!!!
 

Attachments

  • 686583-Workshop 215 (Small).jpg
    686583-Workshop 215 (Small).jpg
    30.1 KB · Views: 528
/ Creating a Workshop & Home
  • Thread Starter
#169  
My siding arrived yesterday, but I didn't get a chance to start on it until today. Trying to get power ready to be connected.

My girlfriend is doing the house wrap, while I'm hanging the sheets. I only put on the full ones to start, kind of getting my feet wet. In the morning I'm gonna start cutting. /forums/images/graemlins/shocked.gif Not sure what to expect, but I did by their special blade for cutting it, so we'll see.

Eddie
 

Attachments

  • 687960-Workshop 221 (Small).jpg
    687960-Workshop 221 (Small).jpg
    58.3 KB · Views: 598
/ Creating a Workshop & Home #170  
If you're going to be doing much work with Hardie products, you need this. There's also a more expensive model made by Snapper that has a lifetime guarantee. I have two of the Snapper shears. They work like a dream; no dust, no muss.
 
/ Creating a Workshop & Home
  • Thread Starter
#171  
Don,

Thanks for the link. I'ver heard about he sheers, but never seen them used. I went to Portor Cable website and found a factory reconditioned one for $50 less.

Doing inside corners seem a bit tricky. The only way I can see to do so would be to round our a wide turn and waste a bunch of material. Especially on door openings.

The saw blade is quick, makes a very clean cut and generates a ton of dust. Wow, it makes some dust!!!!!!!!!!
 

Attachments

  • 689523-Workshop 222 (Small).jpg
    689523-Workshop 222 (Small).jpg
    46.1 KB · Views: 567
/ Creating a Workshop & Home
  • Thread Starter
#172  
The only minor disadvantage of the saw blade is the overcut for the inside corners, not counting the dust. /forums/images/graemlins/grin.gif

I can understand there warnings about cutting this stuff indoors. Even with a breeze, I have to position myself on the upwind side before cutting. It's not an issue, but something to deal with.

Picking up a full panal is much more difficult then cutting them!!!
 

Attachments

  • 689527-Workshop 224 (Small).jpg
    689527-Workshop 224 (Small).jpg
    51.6 KB · Views: 508
/ Creating a Workshop & Home
  • Thread Starter
#173  
The siding really sets of my cedar posts on the porch for the public bathrooms. I've sort of developed a routine that seems to be working.
 

Attachments

  • 689529-Workshop 225 (Small).jpg
    689529-Workshop 225 (Small).jpg
    65.9 KB · Views: 546
/ Creating a Workshop & Home
  • Thread Starter
#174  
The roof arrived a few days early, so I had it set aside until I finished with another project.
 

Attachments

  • 689687-Workshop (Small).jpg
    689687-Workshop (Small).jpg
    67.5 KB · Views: 516
/ Creating a Workshop & Home
  • Thread Starter
#175  
My girlfriend is helping with installing it. Some people relax on their weekends, others really know how to party!!!!!!!
/forums/images/graemlins/smile.gif

The section she's standing on is 32 feet long and a bit on the heavy side, not to mention awkward. She said it was the single most dificult thing she's ever done.

Don't tell her, but it only gets worse. /forums/images/graemlins/laugh.gif /forums/images/graemlins/wink.gif
 

Attachments

  • 689690-Workshop 240 (Small).jpg
    689690-Workshop 240 (Small).jpg
    58.7 KB · Views: 650
/ Creating a Workshop & Home
  • Thread Starter
#176  
How many girlfriends would do this for a guy? Think I got me a keeper!!!!!!!!
 

Attachments

  • 689695-Workshop 241 (Small).jpg
    689695-Workshop 241 (Small).jpg
    54.1 KB · Views: 618
/ Creating a Workshop & Home
  • Thread Starter
#177  
The heat and humidity is the biggest obsticle. We were determined to get this last piece up before hiding in the AC.
 

Attachments

  • 689700-Workshop 245 (Small).jpg
    689700-Workshop 245 (Small).jpg
    55 KB · Views: 570
/ Creating a Workshop & Home
  • Thread Starter
#178  
After something cold to drink and a nap, we'll get started on the other side. If it doesn't rain, that is.
 

Attachments

  • 689701-Workshop 238 (Small).jpg
    689701-Workshop 238 (Small).jpg
    60.6 KB · Views: 575
/ Creating a Workshop & Home #179  
Eddie, you're a lucky man. My wife won't hardly stand at the edge of the porch that is 4 foot off the ground. Her helpfulness doesn't seem to be her best attribute from what we can see. no offense intended, Later, Nat
 
/ Creating a Workshop & Home #180  
Eddie, Please do not take offense at this, but will we ever see a photo of the girlfriend with the building in the background. You have one terrific lady there! Projects like my pond we work together on...........and our ideas clash all the time. Today the dear wife helped with a ton of rocks we bought for the pond perimeter. Back to your project, looking GREAT.........
 

Marketplace Items

2025 Unused SDLGC80 60v Electric Golf Cart (A60352)
2025 Unused...
20FT X 30FT STEEL CARPORT (A58214)
20FT X 30FT STEEL...
2016 Peterbilt 579 Automatic High Top Sleeper (69") (A62613)
2016 Peterbilt 579...
2014 Chevrolet Express Van (A55973)
2014 Chevrolet...
2011 FREIGHTLINER M2 (A60736)
2011 FREIGHTLINER...
CASE ROOT PLOW (A58214)
CASE ROOT PLOW...
 
Top