Placing Pipe Overhead 15' High for Gates

   / Placing Pipe Overhead 15' High for Gates #1  

wroughtn_harv

Super Member
Joined
May 12, 2002
Messages
6,092
Location
Denison, Texas
Tractor
2013 Volvo MC85C
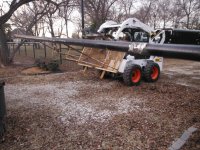
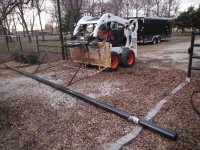
It was a one day job. Client had purchased a new toy hauler and needed their 12' high overheads raised to 15'.

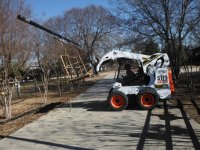
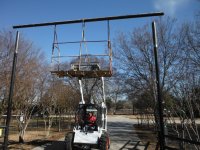
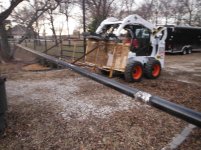
I picked up the new pipe, 4 5/8" for two of the gates and 2 7/8" for the last one. The idea is to cut the overhead at the top of the existing posts. Then trim the post square and add the necessary height already notched for the pipe, replace the overhead. Nothing but a thing. This is how we did it.
 

Attachments

  • 003.jpg
    003.jpg
    945.5 KB · Views: 344
  • 007.jpg
    007.jpg
    1 MB · Views: 359
  • 010.jpg
    010.jpg
    1 MB · Views: 506
  • 011.jpg
    011.jpg
    1.1 MB · Views: 472
  • 014.jpg
    014.jpg
    1.1 MB · Views: 339
  • 015.jpg
    015.jpg
    1,015.7 KB · Views: 297
  • 016.jpg
    016.jpg
    1.1 MB · Views: 439
   / Placing Pipe Overhead 15' High for Gates
  • Thread Starter
#2  
The overhead was pulled without the pipe holder attached. But when we added the new height we had to come up with something that could pick up and place the pipe safely. The 4 5/8" was too heavy to be handled without help at that height. Again, nothing but a thing.
 

Attachments

  • 014.jpg
    014.jpg
    1.1 MB · Views: 249
   / Placing Pipe Overhead 15' High for Gates
  • Thread Starter
#3  
This is one of those deals where you bid a job and figure that you will figure it out if you get it. I had the platform and after searching through the scrap metal on the back of the truck had the materials required top make the pipe handler.
 
   / Placing Pipe Overhead 15' High for Gates #4  
Looks good, Harv. Glad to see you back. :thumbsup:
 
   / Placing Pipe Overhead 15' High for Gates #5  
I built a similar man lift for my tractor's FEL out of the steel crate frame that tractors are shipped in(free from my dealer). Honestly I don't know how I survived without one....the thing is one of the most useful attachments I ever had.
Foamboard003.jpg
 
   / Placing Pipe Overhead 15' High for Gates #6  
My Dad made a "sky hook" for the TPH of a ford Jubilee, hooked a rope blocks in the end of the pipe and put pine tear poles in a hay barn about 20ft up. It was just a pipe that set strait up in the air, there is always a way.
 
   / Placing Pipe Overhead 15' High for Gates #7  
Did you get a new skid steer? What happened to the JCB?

Eddie
 
   / Placing Pipe Overhead 15' High for Gates
  • Thread Starter
#8  
I rented the bobcat. The jcb has a wheel motor down.
 
   / Placing Pipe Overhead 15' High for Gates #9  
Bummer. Hope it's an easy repair, but with all things construction, I'm sure it's gonna have it's surprises. LOL

Eddie
 
   / Placing Pipe Overhead 15' High for Gates
  • Thread Starter
#10  
I did as suggested and pulled both wheel motors and the main pump for rebuilds. The estimate is more than the machine is worth if repaired. I will probably part it out and look for an older Case. I'm 64 and don't see the reasoning behind investing in a new machine at this point in my career. I have too many easier physically in the pipeline to be using a tractor to do difficult projects. Plus for the little bit that I need a tractor I can just rent one.

Of course this means that if I sell the JCB I will have no tractor and have to leave TBN, doggone that sux.
 
   / Placing Pipe Overhead 15' High for Gates #11  
Just a quick question because I am looking at building the same style gate this summer with drill stem, they call it around here. How did you notch the pipe? I have cut it in the past and it seemed to be tougher than the mild steel I usually play with. Also, once in place do you weld it or have a different attachment style? Thanks Brent
 
   / Placing Pipe Overhead 15' High for Gates
  • Thread Starter
#12  
Just a quick question because I am looking at building the same style gate this summer with drill stem, they call it around here. How did you notch the pipe? I have cut it in the past and it seemed to be tougher than the mild steel I usually play with. Also, once in place do you weld it or have a different attachment style? Thanks Brent

I use an angle grinder for cutting. The easiest way I know to lay out a notch is with a framing square. It's the same for any size of pipe. I put the pipe on a flat surface and place the square perpendicular to it. I measure in 1/3 from the square to the top of the pipe. On the 4 5/8" pipe that is about 1 1/4". I then go to the end of the pipe to be cut and measure in the above distance at the middle of the pipe. I then arc back to each side. I cut that out. I turn the pipe over 180 degrees and repeat. An easy way to gauge being on the right path is to look at the end that has been cut. You should have approximately one third of the pipe original length in the middle of one third cut out at each side.
 
   / Placing Pipe Overhead 15' High for Gates #13  
Thanks, been looking forward to this project for a while.

Brent
 
   / Placing Pipe Overhead 15' High for Gates #14  
Good idea on the manlift. I have thought about making one (occasionally). Another detail to keep in mind -- ability to use it as a hoist.

I suspect you will stay around, even if you sell your current machine.
 
   / Placing Pipe Overhead 15' High for Gates #15  
Hijaacking the thread -
Are those pipes extremely cheap in some areas? I've been seeing them being used for many things.
 
   / Placing Pipe Overhead 15' High for Gates
  • Thread Starter
#16  
If you call $6.00 per foot extremely cheap then I guess they're cheap.
Hijaacking the thread -
Are those pipes extremely cheap in some areas? I've been seeing them being used for many things.
 
   / Placing Pipe Overhead 15' High for Gates #17  
I use an angle grinder for cutting. The easiest way I know to lay out a notch is with a framing square. It's the same for any size of pipe. I put the pipe on a flat surface and place the square perpendicular to it. I measure in 1/3 from the square to the top of the pipe. On the 4 5/8" pipe that is about 1 1/4". I then go to the end of the pipe to be cut and measure in the above distance at the middle of the pipe. I then arc back to each side. I cut that out. I turn the pipe over 180 degrees and repeat. An easy way to gauge being on the right path is to look at the end that has been cut. You should have approximately one third of the pipe original length in the middle of one third cut out at each side.

Having read your description eleventy times I still have no idea what you are describing. I am not usually that dense but I seem to have no frame of reference for what you are describing. Are you putting the square perpendicular to the length, or the diameter? What do you mean you measure to the top of the pipe, aren't you cutting the top of the pipe, so shouldn't you be measuring in from the top? I have no idea what you mean by "You should have approximately one third of the pipe original length in the middle of one third cut out at each side." I have done this in the past a couple times and it has been a pretty much guess-work process with me grinding some out and then just cutting out more as required until it fit, so I would love to understand what it is you are doing. From what I remember though, the high sides of the vertical bar reach the center of the horizontal bar, not one third, so I am not sure what is different. Do you have a picture perhaps, so I could set my frame of reference and then try to read your description again? Thanks.
 
   / Placing Pipe Overhead 15' High for Gates
  • Thread Starter
#18  
Sorry for the confusion.

If you are looking down a pipe head on you will have a circle. Let's break that into four quadrants. The depth and width of each quadrant will be the same number. That number is what we use to find the depth of the notch we cut in the end of the pipe to make a cope, fishmouth, or notch.

The easiest way I know of finding that number on a piece of pipe that we are wanting to weld another piece of pipe of the same size at a ninety degree angle is to use a vertical line provided by a speed or framing square that is vertical and perpendicular to an edge of the pipe. If you use 2" pipe for instance that measurement will be about 5/8". The five eighths of an inch measurement is what we measure from the end of the pipe center line of the pipe. We then draw out an arc to each side of the end of the pipe from that mark.

You could accomplish the same thing by placing a piece of the same sized pipe perpendicular to a pipe at the end. The idea is to replicate the arc of the pipe on the end of the piece that is going to be welded to the pipe at a ninety degree angle. Of all the way I know of doing this I have found the framing/speed square method the easiest and universal no matter diameter of the pipe.
Having read your description eleventy times I still have no idea what you are describing. I am not usually that dense but I seem to have no frame of reference for what you are describing. Are you putting the square perpendicular to the length, or the diameter? What do you mean you measure to the top of the pipe, aren't you cutting the top of the pipe, so shouldn't you be measuring in from the top? I have no idea what you mean by "You should have approximately one third of the pipe original length in the middle of one third cut out at each side." I have done this in the past a couple times and it has been a pretty much guess-work process with me grinding some out and then just cutting out more as required until it fit, so I would love to understand what it is you are doing. From what I remember though, the high sides of the vertical bar reach the center of the horizontal bar, not one third, so I am not sure what is different. Do you have a picture perhaps, so I could set my frame of reference and then try to read your description again? Thanks.
 
   / Placing Pipe Overhead 15' High for Gates #19  
Sorry for the confusion.

If you are looking down a pipe head on you will have a circle. Let's break that into four quadrants. The depth and width of each quadrant will be the same number. That number is what we use to find the depth of the notch we cut in the end of the pipe to make a cope, fishmouth, or notch.

The easiest way I know of finding that number on a piece of pipe that we are wanting to weld another piece of pipe of the same size at a ninety degree angle is to use a vertical line provided by a speed or framing square that is vertical and perpendicular to an edge of the pipe. If you use 2" pipe for instance that measurement will be about 5/8". The five eighths of an inch measurement is what we measure from the end of the pipe center line of the pipe. We then draw out an arc to each side of the end of the pipe from that mark.

You could accomplish the same thing by placing a piece of the same sized pipe perpendicular to a pipe at the end. The idea is to replicate the arc of the pipe on the end of the piece that is going to be welded to the pipe at a ninety degree angle. Of all the way I know of doing this I have found the framing/speed square method the easiest and universal no matter diameter of the pipe.

Thanks for the reply and I see your frame of reference now (which I thought I saw before but your number kept throwing me off) but I don't see why you are saying the depth or width of the quadrant (pipe radius) is 5/8 on a two inch pipe instead of 1". Perhaps you are taking an inside measurement of the pipe, so the radius of the hole instead of the radius of the whole pipe? If so, then without having one in front of me to confirm then I can see it might be 5/8 depending on the thichness of the pipe wall. When I have done it, I have ground the inside edge of the high side of the vertical pipe to allow it to wrap around the horizontal pipe farther. Are you just cutting it square and then welding it like that? Don't you end up with a lip where the outside of the vertical pipe doesn't join to the horizontal pipe, or are you filling in that lip with your weld and then grinding it level? I have been mostly free-handing it so I would like to be able to measure it properly.

As I say, I have no where near your experience with this, so I am trying to understand why you do it the way you are. Does filling in the lip area make for a stronger weld? Now that I think about it, your way would probably look better too, since my weld had a ridge at the high side of the vertical where it was so close to the side of the horizontal pipe. Thanks.
 

Tractor & Equipment Auctions

Case Titan 3530 (A56438)
Case Titan 3530...
2024 CATERPILLAR 305 CR EXCAVATOR (A60429)
2024 CATERPILLAR...
2014 MAGNUM PRODUCTS LIGHT TOWER COMBO (A55745)
2014 MAGNUM...
UNUSED FUTURE WALK BEHIND POWER TROWELL (A52706)
UNUSED FUTURE WALK...
2004 AGCO Gleaner 3000 Corn Header (A56438)
2004 AGCO Gleaner...
2021 KENWORTH T680 TANDEM AXLE SLEEPER (A59905)
2021 KENWORTH T680...
 
Top