Welding table build

   / Welding table build #21  
Shield Arc,
Please explain what you're doing and why in the drawings in post 3 and the photos in post 11. I want to make sure I understand.[/QUOT
In post 3, the lines and dots represent places you've applied heat with the torch and when those spots cool, they'll contract more than they've swelled and draw the ends of the steel upward and the places where heat was applied downward, is that correct?
Yes that is correct.


Hey SA, how long did it take to learn you could bend steel like that after you invented fire? :laughing: ... Oh wait, forgot no picking on the old guys..
In the 1970s I worked with a guy for about two years, supposedly he worked at Todd shipyard on Harbor Island in Seattle, with the guy who did the beams on the Seattle Space Needle. Well that's his story! But I do know he was very good at heat shrinking.


In the third photo, that must be a pump type spray bottle in your hand. At first I thought you were applying heat with a plasma cutter and couldn't figure out why you weren't wearing a glove.
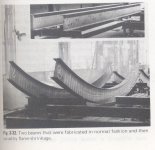
The final two photos have me stumped. Is the red arrow pointing at something or showing the direction you are drew the metal? Is the final photo the result of your work?
I ask all these questions because I keep a list of links with pointers on metal working. If the link to this one is labeled with your name, I'll know it's expert information.
Thanks,
Stuck
Yes that was a spray bottle of water.
After welding that beam it wasn't square to the bottom beam, so I heated a wedge in the beam to bring it back square.
 
   / Welding table build #22  
Shield Arc, you should post the pictures of the I beams that were curved with heat in the Procedure Handbook. I'm sure that takes some expertise to do but very impressive they could get them the same.
I don't remember seeing that in the Procedure Handbook.:confused: I'll have to find my book, look it up and scan the pictures.;)
 
   / Welding table build #23  
All the years I've owned this book, I don't think I've ever seen this picture!:eek:
Really impressive, I would love to see that done! :cool2:
 

Attachments

  • Beam Flame.jpg
    Beam Flame.jpg
    497.8 KB · Views: 308
   / Welding table build #25  
If your plate was sheared from the steel supplier the application of small amounts of heat will not work. The shearing action sets up stresses along the edges and into the plate making the heating method not work.
I don't know if that's necessarily true.:confused: I was in the raising gang, there must have been 8 or 9 weldors in the welding crew. We sheeted a 80' x 80' x 70' tall building with 4' x 8' sheet of 10-GA. 100% welded all the way around. The sheets came off a coil line and were sheared to length. The floor was 6,400-sqft, once welded you couldn't hardly walk on it, it was so bowed. Company brought in the guy who taught me how to heat shrink. When he was done the floor was as tight as a piano wire. Now was the stress relieved by welding? I just don't know!:confused3:
 
   / Welding table build #27  
If your plate was sheared from the steel supplier the application of small amounts of heat will not work. The shearing action sets up stresses along the edges and into the plate making the heating method not work. If it was torched it will work fine. You can even flatten 6" thick pcs. You can cool the heat with water or air. Air is slower but makes less mess.
This isn't exactly true, any stress can be corrected with the right amount of heat applied in the right spot regardless of what induced the stress. Small amounts of heat may or may not be enough to act on the metal. Normally the metal needs to be heated at least to red hot if not orange in order to get the maximum amount of shrinkage. Heating to anything less than 800-900F wont do much in the way of stress relieving as the steel molecules just aren't hot enough to be active at that point, you need 1000-1250F (red hot to orange hot)to really get the molecules to bouncing around and then you get the pulling effect. Water applied to carbon steel immediately after heating gets the best results, air cooling allows a lot of the heat to be transferred to the adjoining area spreading out over a large area and anything that is cooled below 800-900F isn't going to react much. Diamond shaped heating gives you a bi-directional pull more so than a circle. When straightening weld induced warping, you want to put approximately the same shape heat and amount of heat that the weld induced and it will usually counteract the weld shrinkage forces. Usually it will take a couple of times to get it right rather than try for one big heat that may be too much and then you start chasing it the other direction, much better to get a little bit at a time.
I have worked with millwrights heating pipe and welds so that when flanged up to a pump there is absolutely no stress on the pump flange. This is absolutely the most sensitive of heating for stress reducing that you can get when you have dial indicators hooked up and can see how much the heat is moving the metal around. Occasionally, we would have to cut out a weld if it was too far out of alignment and couldn't be heated for drawing it. Of course the better way of doing this is to heat the entire weld nearest the pump with a full circumferential weld using a PWHT electric coil. Bring the entire pipe up to 1200-1250F and then tighten the bolts to the flanges and let it cool. If it is anywhere near square and plumb, this will let it settle into alignment perfectly.
 
   / Welding table build #28  
Gary I remember those days. I went through a Millwright apprenticeship. Worked in a lot of oil refineries dialing in pumps and motors. That kind of work drove me crazy! I'd much rather install conveyors. Got dispatched out of the Pile Driver's hall as a certified weldor, that's when I found my true calling, got to play with BIG cranes all day!:cloud9::laughing:
 
   / Welding table build #29  
I stopped in here to get some ideas about building a welding table. In the process I learned why metal warps when welded. I've been using a MIG for ten years. Noticed it tended to warp more than the ole Lincoln stick welder. But I never knew why. Also never understood why it tended to warp toward the weld. I'm guessing it's the same theory as heat shrinking??? After the hot weld cools it pulls the metal tighter than it was before, thus creating a warp??

This is a very interesting discussion. I feel so inadequate. But if you guys don't mind me peaking over your shoulders, I'll at least catch up to the point I understand what you are taking about!!!!

Thanks to everyone that contributed to the lesson on heat shrinking. Especially to Shied Arc. You talked in a language I understood.

Now to CDNFarmBoy. I'm very interested in the table build. It's very similar to what I want to build although mine won't be quite as large. I'm curious to see what you do about the table top warpage?? I'm way to OCD to not try to fix that. And I want to use my table top to jig projects so want my table flat. Also want it to be level so the tips provided on adjustable casters rang my bell as well.

Thanks to everyone's contributions. Great thread so far. Can't wait to see the finished project!!! :)
 
   / Welding table build #30  
I've seen a good bit of plate warped. It all depends on how long it has been stacked and how long and wide it is and how may supports it has under it. Over time I've seen unsupported metal with a little weight on it begin to sag permanently. But I've also seen imported metal bow and twist. I had some 3/8x3x 3 angle iron come and it was warped over an in from end to end with a 20 ft piece. Tubing bowed, split and twisted a few degrees too. Don't expect metal to be true or square, unless it has been milled or specially finished. Cold rolled is an example. It's much more dimensionally precise than hot rolled. I'm also using some pickled and oiled plate (P.O. Plate) that has seemed to be better quality as far as dimensions and true thickness. It's pretty neat, it's like having "blued" surface on gun...smooth but a little greasy...but rust resistant. If I was building a new work table, that's what I'd use.

Whenever I go to my metal supplier, I go around to the edges of the fence and walk through his back warehouse...that's where I find dog ears and miscuts. I've got a stock pile of 2x5x11 gauge tubing 10 ft long for 10.00 a stick because it was cut to order and it was never picked up...and a rusting but serviceable pile of miscellaneous cold rolled rod, chrome moly tubing that had a bend or some other slight defect. Rarely do I use a whole piece at one time. The bend, twist or bow can be cut around if the price is right.
 
   / Welding table build #31  
I would add, that for center supports, I've seen all kind of crazy designs. but a simple ladder type construction for the base frame is best. I use flat bar for the supports instead of tubing because as I said, tubing isn't true in many cases. It also likes to pull if you weld it.

IF you want everything to stay true on the top, once you get things trued up, just tack weld the top in a few places. Don't heat it up and don't run welds longer than 1" every foot or so. If it is trued, then you won't need it.
 
   / Welding table build #32  
Mark, I buy seamed tubing from a local farmer. He buys it bundle at a time to build pipe cattle corrals and gates. It's rejects. He lets me pick thru his piles and get the straightest without any splits. And like you, I'm usually making short runs with it building cages for Jeeps/Buggies. Once in a while he'll get some rectangular tubing or angle iron. It too is rejects. But if you sort thru the pile you can always find stuff that's useable. And it's dirt cheap.

I'll check into the P.O. Plate when I build my table. Thanks for the tip!!!
 
   / Welding table build #33  
I'll check the P.O. Plate when I build my table. A 1" 2' X 3' will do the job for now. I think:cool:

As always, thanks for sharing:thumbsup:
 
   / Welding table build
  • Thread Starter
#34  
As ovrszd said earlier today, HUGE thanks to all for the lesson on heat shrinking. If I'm not happy with how flat I manage to get the table (or if I warp things more during welding), I now have options to correct it.

At least I can ratchet strap the plate straight to use as a surface to build on which will hopefully make the frame straight & square. Not insurmountable, just annoying and something I didn't expect to have to do with a $300 chunk of new steel

This table Viewing a thread - New Welding Table Pics. was one of the many I found with some features I liked. What I don't understand with it is why so much weld on the cutting slats for when they need replacement and I'd also wondered about warpage of the main beams with that much weld concentrated on the one side.
 
Last edited:
   / Welding table build
  • Thread Starter
#35  
I'd planned on spending some time working on it tonight but ended up at the Fire Hall for a couple hrs checking equipment and never did get to the garage.

I've got ideas from many different builds I've found from searching and some of my own that will be incorporated into this. Hopefully by the weekend I'll have all the prep work done and can start tacking things together and get some better pics for you guys of something more than a stack of steel and cleaned up joints.
 
   / Welding table build #36  
That table (from link) is overbuilt for 1/2 plate....It would work well with 2" plate or thicker. There's no need for one that much support. It would hold up a D7 dozer. The key to learning fabrication is to use materials wisely...make it strong enough, a little overbuilt maybe, but not something that heavy. You learn nothing about building by making it that way. Personally, I'd just make some brackets out of some of the flat bar that would "sandwich" the lengths of flat bar for a cutting surface and bolt them in or build a perimeter frame around it so they could just lay in without the bolts.
 
   / Welding table build #37  
I like the Procedure Handbook. I just wish it had more pictures.:D Given the right topic I'll remember lots of pictures I've seen in the past. I think the curved beams show just how accurate and useful heat can be with the right person using it.

In that picture it looks like there a lots of those curved beams in the background. Maybe the guy who taught you worked on those?
 
   / Welding table build #39  
Ron here is what the Procedure Handbook looks like. I'm sure you can still get them on Lincoln's site, and may be the cheapest way.
Here is another good book on heat shrinking of shapes, the guy is good with shapes, but a little weak with plate, as I' am.
Books
 

Attachments

  • Lincoln Handbook.jpg
    Lincoln Handbook.jpg
    476 KB · Views: 143
  • Metalworking.jpg
    Metalworking.jpg
    365.1 KB · Views: 157
   / Welding table build #40  
.... Personally, I'd just make some brackets out of some of the flat bar that would "sandwich" the lengths of flat bar for a cutting surface and bolt them in or build a perimeter frame around it so they could just lay in without the bolts.

Mark, I bought a piece of 1/2"x28"x46" steel for my first welding table, and am trying to lay out an appropriate frame; strong, but not over-the-top. I had considered using 3" 'C' channel, or angle iron, for a ladder frame. Never thought of using flat-bar.

Can you provide a simple sketch using your suggestions? Thanks.
 

Marketplace Items

UNVERFERTH 330 8 AND 1/2 INCH EXTENSION STUB TUBE WELDMENT FOR FRAME (A55315)
UNVERFERTH 330 8...
2013 ORTEQ ENERGY GN182 GOOSENECK HOSE TRAILER (A58216)
2013 ORTEQ ENERGY...
500 BBL FRAC TANK (A58214)
500 BBL FRAC TANK...
2020 Freightliner M2 106 AWD Altec DC47TR Digger Derrick Truck (A60460)
2020 Freightliner...
Bobcat 873 (A55272)
Bobcat 873 (A55272)
UNUSED IRANCH IRTPL 10000Ib TWO-POST CARLIFT (A60432)
UNUSED IRANCH...
 
Top