Sweepster Rotary Broom - rebuild and modification

   / Sweepster Rotary Broom - rebuild and modification
  • Thread Starter
#21  
I refined my CAD model a bit and added the bearings. Actually I have changed it a bit since I took that screen shot, but, meh, close enough. I also made a mock-up out of hardboard and 2x4 blocks to see better how it fits. I can see i will need some relief around the axle so it can pivot and not bind up on the rails.

Looks like I am ready to order up some steel Mon AM. One full 20' stick of 4" x 5/16" is going to make up the bulk of this thing. I'll need some other bits beyond that like some 2" wide flat bar but first things first. The steel place is close so no big deal making an extra trip or two. So I can rough out the basic frame and see what else I need so I don't buy stuff I won't need.

PTO_mount2.jpg


PTO mount mock up (1).jpg


PTO mount mock up (2).jpg
 
   / Sweepster Rotary Broom - rebuild and modification
  • Thread Starter
#22  
I've been chipping away at this in between other things. Making some progress. I have the basic frame together, the 2 mid bearing mounts in place and the rear mount of the frame to tractor settled. Here are a few pics.

This one is the skeleton of the frame with mid bearings and you can see the rear mount bracket on the right. It will get a lot more reinforcement before it is complete, but first things first.

Subframe mid bearings (Large).jpg


These 2 pics show the above frame in place and connected. Looking forward from rear. In the second pic you can see the 2 bolts going up into the transmission case for the rear mount.

Subframe Mid in place (Large).jpg
Subframe Mid in place2 (Large).jpg


And then laying out to mount the front bearing. That black round part is the spline shaft adapter for the pump. I just ordered the pump as I will need that to get the rest of the front-end figured out. You can see the solid rectangular shaft poking through the bearing. There is a similar adapter for that shaft that you can't see. I will have a machinist friend turn the piece that goes in between those 2 adapters and then I will weld up those 3 parts to make this one solid adapter which will finally be welded to the rect shaft, which will need to be shortened. The middle part is slightly bigger diameter and will be machined to the bore of the bearing. This bearing will be set back a few inches as shown and then one more plate will be put on the front and machined to match the SAE-B hyd pump mount on the nose of the pump. Slide the pump into the spline adapter on the end of the shaft, connect the 2 bolts to the plate and ready to go. The pump stays with the attachment.
Front bearing layout (1) (Large).jpg
Front bearing layout (2) (Large).jpg


But before I get too far on that front I need to make the mounts for the middle and front that hold all this to the tractor. So that will be next as i wait for the pump to arrive.

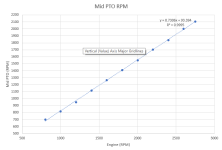
And then just for giggles I plotted the engine RPM vs Mid PTO RPM:
1618203813329.png
 

Attachments

  • 1618203786637.png
    1618203786637.png
    18.4 KB · Views: 115
   / Sweepster Rotary Broom - rebuild and modification
  • Thread Starter
#23  
More progress. Have continued picking away at this. Got the shaft adapter made by a machinist friend of mine so that is ready to go and the last piece of the puzzle to put this all together. I finished everything that made sense to do from under the tractor so I pulled the subframe out and got it on the bench. Front bearing plate is tacked in, all supports are fully tacked in. The pump mount plate was also bored out by my friend to fit the SAE B mount pump, but I haven't tacked that in yet. Here is a look at the subframe on the bench

Subframe driveshaft done (1) (Large).jpg
Subframe driveshaft done (2) (Large).jpg


Subframe driveshaft done (3) (Large).jpg


In the first two photos you can see the pump supported on a stand at the front of the frame and the large square bearing pillow block which is the front bearing. Everything is fully fitted up now and the rectangular PTO shaft which is right behind that front bearing was cut to fit.

Next step is I need to weld the parts of the adapter shaft together as they are currently just lightly press fit together. The adapter is the piece between the pump that goes thru the front bearing and also gets welded to the rectangular PTO shaft on the other side of the front bearing. Once I get that welded up, I can set the final position of the pump mount plate and tack that in. It would be nice to have a rotary weld positioner to do that, but I will have to get by doing it in short sections and then turning it.

Then it is on to fully welding out the whole thing and then powder coat. I still have a few braces and such to add in there, but nothing major.

Plus I also checked to make sure i could actually get the shaft pieces and bearings in and out of the frame which is pretty important to do before you weld it all solid...

I'm hoping to get this into powder coat sometime next week. Then I can move onto the sweeper unit for the real fun!
 
   / Sweepster Rotary Broom - rebuild and modification
  • Thread Starter
#24  
Subframe is all fully fitted and welded-out. I just need to check that it doesn't interfere with the axle pivot before I send it in for powder coat, but I need to put the loader back on for that so I can lift the front end - tomorrow after work.

Subframe welded out (1) (Large).jpg
Subframe welded out (2) (Large).jpg


Subframe welded out (3) (Large).jpg
Subframe welded out (4) (Large).jpg
 
   / Sweepster Rotary Broom - rebuild and modification #25  
Nice work. Can’t wait to get my metal shop outfitted and going. Looks great.
 
   / Sweepster Rotary Broom - rebuild and modification #26  
Looks good, I would suggest you make a shield/protector for that pump sitting out there if you haven't already. I deal with trash trucks a lot that have a pump mounted off the front and you would be surprised how much they get bumped!

I lucked out and got a 3pt broom really cheap so I'm sticking with pto power for now.
20210314_135215.jpeg
 
   / Sweepster Rotary Broom - rebuild and modification
  • Thread Starter
#27  
Thanks TMGT. You gave me something to think about for a while, but in the end I don't think it is going to be the same problem you see. The pump was only present in those photos to set up the mounting and get the shaft dimensions right. In reality the pump stays with the attachment on the FEL, and does not stay on the tractor. When the sweeper is mounted on the SSQA, I will connect the pump. When I pull the sweeper, the pump stays with it. I did that as connecting hoses is always a PITA and this way I keep the entire hydraulic system closed and isolated on the attachment. So the FEL will protect it for the most part. My primary use for the sweeper is snow removal, so it won't be going offroading in the woods with this on it.

And the only 2 times I have taken the FEL off were when I initially got the tractor so I could work on building the third function, and again these past couple weeks to work on the subframe (it was FAR easier to do that without the loader in the way with how often I had to get under and around the tractor...)

There is no way my neck could tolerate the constant looking back for running a 3pt blower or broom, but it certainly is a lot cheaper! I'll be well over $3k by the time I am done. But a good part of it is the fun in the engineering and building of it...
 
   / Sweepster Rotary Broom - rebuild and modification #28  
Thanks TMGT. You gave me something to think about for a while, but in the end I don't think it is going to be the same problem you see. The pump was only present in those photos to set up the mounting and get the shaft dimensions right. In reality the pump stays with the attachment on the FEL, and does not stay on the tractor. When the sweeper is mounted on the SSQA, I will connect the pump. When I pull the sweeper, the pump stays with it. I did that as connecting hoses is always a PITA and this way I keep the entire hydraulic system closed and isolated on the attachment. So the FEL will protect it for the most part. My primary use for the sweeper is snow removal, so it won't be going offroading in the woods with this on it.

And the only 2 times I have taken the FEL off were when I initially got the tractor so I could work on building the third function, and again these past couple weeks to work on the subframe (it was FAR easier to do that without the loader in the way with how often I had to get under and around the tractor...)

There is no way my neck could tolerate the constant looking back for running a 3pt blower or broom, but it certainly is a lot cheaper! I'll be well over $3k by the time I am done. But a good part of it is the fun in the engineering and building of it...
Sounds good, was just thinking something like thr Mack concrete trucks have a little "A" shaped guard around the front mounted pump.
It probably wouldn't be a problem with how you're going to use it, just figured it might give the pump and hoses some protection. Seems like I get damage to at the weirdest times, once wrinkled a fender from a branch plowing snow in my driveway! Got caught in the tire and wedged between the tire and fender lip.

Agreed on having to look backwards for the pto brooms, but at under $700 into a like new hyd. angle 6ft broom I figure I can live with it
 
   / Sweepster Rotary Broom - rebuild and modification
  • Thread Starter
#29  
Got it back from the powder coaters, got everything assembled, greased and mounted up perfectly fine with a test run (without the pump). They had a stock gray color that is lighter than Kubota gray but looks nice. Pic of it all assembled. Didn't take a shot of it installed, but it looks the same as above, just painted. First half of this adventure is complete...Now to find time to start on the sweeper!


Mid PTO frame painted assembled.jpg
 
   / Sweepster Rotary Broom - rebuild and modification
  • Thread Starter
#30  
Welll alrighty! Let's get this going again... I got distracted for the past couple months so am only now getting to the actual sweeper rebuild. First this thing followed me home:

Bridgeport loaded.jpg
Bridgeport in place (2) (Large).jpg


It took quite a while to clean it up and replace the wear items, plus come up with a VFD to run it, but now that is in place. I figured a Bridgeport would be helpful for the mods to the Sweeper too...

But I was also rebuilding my little tiller that we acquired from my late MIL's estate and that is in this thread:

So now with all that stuff out of the way, it was time to drag the sweeper inside and start the teardown today. I got all the hoses and fittings off and removed the angle cylinder, which I was shocked to see it actually come off as I thought it was rusted on solid. But a 3-arm puller got one end moving and the other ball end just popped off miraculously. So off to a good start! I still think i will need to replace it, but at least I didn't have to cut it off. You can see the angle cyl in the 2nd pic below:

Sweeper start tear down (Large).jpg
PXL_20210725_215029057.jpg


Then I discovered that the broom spins fine with it up on blocks, so the motor and free-end bearing appear to be good. Huge win on the motor as that is an expensive bugger. The bearing ended up being seized to the shaft so I did have to cut and beat it off of the shaft, but it looked like replacing it was the wise move in any case.

Broom pulled out (Large).jpg
Sweeper start tear down 2 (Large).jpg


Broom first section (Large).jpg


Still lots of cleaning and such to do, and I need to replace the broom sections entirely as they are very brittle. Getting that apart will be the next task and about the last part of actual tear-down. Next after that will be figuring out what to cut off the current hacked-up mount to put on the SSQA plate and the hyd tank and other such fun.

I don't really have a good way to lift heavy objects in the shop right now as the tractor is my only real lifting device and that is of course very limited to manuever. Thinking I might want to get a cherry picker or something but then I need to find a place to store THAT too. More to come, but there will probably be a lot of down time trying to sort out where to put everything as the tank is a big issue and I still need to be able to mount the angle cyl, the SSQA plate and the structure to tie it all together and be able to hang the sweeper from springs for the right ground contact/pressure.
 
 
Top